Connect to a Virtual Machine
Work in progress
The browser-based connection section (Guacamole) is not yet documented. See the TODO comments below.
veHaaS supports two ways to connect to the Virtual Machine (VM) associated with your booked Assembly:
- RDP client — using the veHaaS remote client application
- Browser-based — directly in your browser, no client software required
Connect via Browser
Connect via RDP Client
Configure the RDP connection
When connecting to the virtual machine through the veHaaS website, an RDP connection is automatically established using predefined settings. Those settings can be adjusted manually by modifying the rdpsettings.json file inside of your %ProgramFiles%/veHaaS-remote-client folder.
Enabling multi-monitor support
One example use-case which requires manual editing of the RDP settings is multi-monitor support. In order to make this work, you first have to figure our which monitor IDs you want to use for you connection. You can do this by running the following command in a local powershell:
This will open a window showing all connected displays with their IDs, resolution as well as pixel positions.
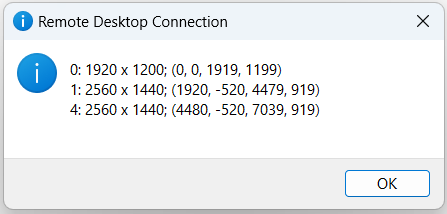
Using this information you can now note the monitor IDs you want to use for the remote desktop connection. Using this information you can open the rdpsettings.json file and add the following two lines to the Parameters field of the JSON:
{
    "Parameters": [
        // ...
        "use multimon:i:1",
        "selectedmonitors:s:{comma-separated list of monitor IDs}"
    ]
}
A resulting JSON for the monitor setup displayed in the screenshot above could look like this for example:
Attention
RDP only supports multiple monitors if they are positioned next to each other. So for the example setup displayed in the image you could only use the following combinations for the multi-monitor settings:
0,11,40,1,4
Configure the Virtual Machine
To successfully send and receive messages, the channel mapping between CANoe and the VN device must be configured. This can be done within CANoe under: CANoe: Hardware -> Channel Mapping
Hint
Make sure that the VN-Interface, which is part of the Assembly is powered on. Otherwise it can`t be selected within CANoe. How the tester can check whether the device is switched on is described in section assembly managing.
Transfer your testsuite to the VM
- You can use Gitlab/hub to clone a testsuite onto the VM. For that you have to add a SSH key to veHaaS.
- You can mount your local C: or D: drive to the VM. (Slow for large number of files because of SMB protocol)
- You can drag an drop files onto the VM. (Also slow because of SMB)